

How To Change Upper Control Arm Bushing On 2002 Buick Rendezvous
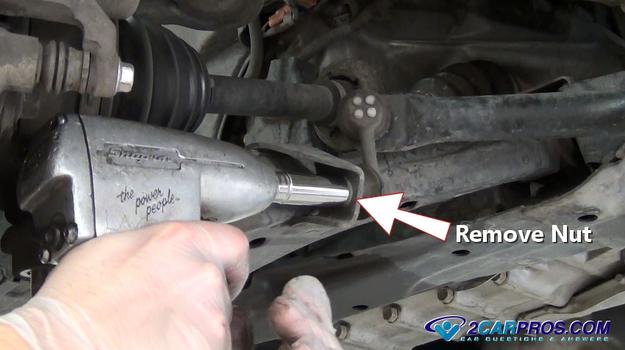
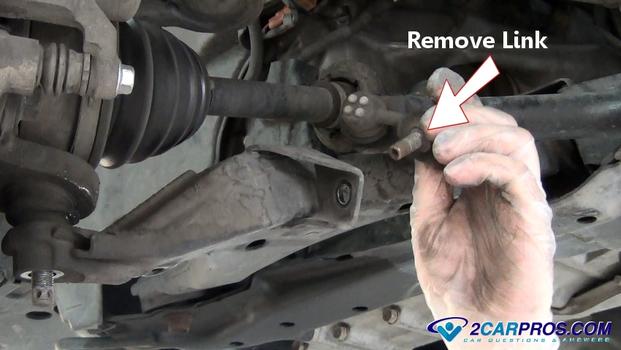
A lower control arm is designed to act every bit a support betwixt the car frame and the spindle which is where the tire is located. Every auto is designed with control arms no thing if it is conventional, hybrid or electric. At to the lowest degree 2 command arms are on any car while contained rear break models will take at to the lowest degree four. These arms consist of ii condom bushings a metallic frame and in some cases a brawl joint. Responsible for allowing the wheel to move upward while the car hits at crash-land without transferring the motion to the body of the auto a control arm acts like a hinge which supports the weight of the car by using a spring and shock assembly. Because the weight of the car is transferred through the control arm two condom bushings are fitted at the pivot betoken and bolted to the frame. Road weather condition and driving habits tin contribute to the article of clothing of these bushings which will become worn and fall apart. These bushing can be inspected by raising the car up and looking for an irregular configuration of the condom heart of the bushing. Many control arms have the brawl joint manufactured into the arm which will be replaced along with the command arm itself. When 1 control arm is worn it is highly advised to supervene upon the opposing arm. If yous were to take your motorcar into a repair garage or the dealer to have a control arm replaced parts and labor would cost you lot between $280.00 and $350.00 (US) per side depending on the manufacturer. If yous are replacing the arm yourself you tin get an replacement arm from Amazon or the local parts store for betwixt $44.00 and $95.00 (US) each. In this guide we show how you can not only supersede the arm just replace the bushing in the arm which volition save even more considering the bushing only costs betwixt $9.00 and $14.00 (Us). SPONSORED LINKS There is a video of this chore being done at the bottom of this guide. You will need to start past removing the bike and jacking the machine upward while supporting information technology on jack stands. As well wear protective eyewear and gloves. 1. Release the Brawl Joint To start the ball joint must be released which can be washed using a large wrench 20mm to 24mm or socket and loosening the ball joint nut after the cotter pin has been removed. Then by using a hammer strike the spindle or control arm bulkhead to "shock" the taper fit loose. If this chore is beingness done on "alive spring" suspension (shock) the lower command arm must be held by a hydraulic jack and and then slowly lowered once the brawl articulation is released. 2. Remove the Sway Bar Link SPONSORED LINKS A sway bar will be connected to the control arm by way of the sway bar link. Remove the nut using a 14mm or 15mm wrench or socket. There could exist a mini taper fit for this connectedness so you may need to shock it loose much like the brawl articulation. Grasp the sway bar link and remove it abroad from the lower control arm mount. This will help the sway bar link stay out of the way during the job. 3. Remove the Control Mounting Bolts SPONSORED LINKS In that location will exist two control arm mounting bolts which could be horizontal or vertical. Utilize a 19mm to 22mm wrench or socket to loosen and remove the bolts. Some bolts volition have a nut on the backside which will need to held past an additional wrench. These bolts will be tight so make sure the socket or wrench is securely on the head of the bolt to avoid rounding. A universal joint and socket tin be used to remove the rear command arm bolt which makes the job easier. Later the bolts have been removed the arm may exist loose then keep your easily on it. 4. Remove the Lower Command Arm If the control arm is however in its mounts firmly grasp the arm and pull it outward while moving information technology upwardly and down to remove it from the frame mounts. SPONSORED LINKS 5. Replace the Bushings If you lot are replacing just the bushings and then go on with this guide. If you are replacing the unabridged control arm and so go along onto number 6 in this guide. In the paradigm below y'all can see the former bushing is torn assuasive the command arm to wonder around in its mounts which causes brake pull and irregular tire clothing. Match the new bushing to the old bashing located in the control arm. It should be an identical match. A printing will be needed to remove the onetime bushings and install the new unit. Commencement mark the orientation to ensure the new bushing volition be installed correctly. If the bushing is incorrectly installed information technology will tear while incorrectly performing. Look at the bushing so the flex part of the bushing is in the same location equally the original. Position the lower command arm into a hydraulic printing using a printing cone and cup to force the bushing from the arm. There will exist an audible "pop" when the bushing starts to motility. SPONSORED LINKS Go along pressing the bushing until fully it is removed from the arm. The command arm will become loose when the functioning is consummate. So you lot tin release the press and remove the arm. Here we evidence the right orientation of the bushing which will be installed in the same way as the old bushing. Identify the new bushing into the lower control arm while observing the marks you made from the sometime bushing. Do not apply lubrication to the bushing case because it will let the bushing to walk its style out of the arm while in use. SPONSORED LINKS Marshal the printing and slowly force the new bushing into place. Brand sure the bushing stays straight during the initial printing then it does non distort the housing. Once the press has begun the bushing will stay straight. Ostend the total installation of the new bushing and repeat this procedure for the opposing unit of measurement. One complete the control arm is ready to be reinstalled. Here is a video of the job being done past i of our mechanics. 6. Reinstall the Lower Control Arm While grasping the new or rebuilt lower control arm wedge the bushing into the fame mounts. This might have a footling doing which an up and down motion will assist with while pushing inward on the control arm. SPONSORED LINKS Equally y'all are installing the arm watch the bolts holes and so you lot tin align them to help become the bolts back into the holes. You tin utilise a screwdriver to help y'all perform this action which is demonstrated in the paradigm below. One time aligned insert the control arm mounting bolts past hand to avoid cross threading. Do not tighten the bolts until all bolts including the ball joint is started. Position the lower ball joint and insert information technology into the control arm and install the nut by hand. SPONSORED LINKS Insert the sway bar link into the command arm and reinstall the sway bar link and nut. After all bolts and basics have been installed tighten the forepart arm mounting bolt. Tighten these bolts to articles torque specification which usually between 65 and 75 foot pounds. A universal socket and extension can actually assistance when tightening the control arm bolts. SPONSORED LINKS Tighten the lower ball joint castle nut while aligning the cotter pin holes. Once the nut is tight insert the cotter pivot. This pin is used to continue the nut in place equally a safety precaution. Concord the sway bar link in place while tightening the nut with the wrench or socket and you are all set. Reinstall the wheel and lower the car off of the jack stands. It is highly brash to have the machine aligned. When starting time driving the motorcar listen for strange noises which are a sign the task will demand to be rechecked. SPONSORED LINKS If you have any lower control arm questions, please visit our forum. If you lot need motorcar repair advice, please ask our customs of mechanics is happy to help you lot and information technology is always 100% free. We hope y'all enjoyed this guide and video. Nosotros are creating a full set of car repair guides. Delight subscribe to our 2CarPros YouTube channel and check dorsum ofttimes for new videos which are uploaded almost every twenty-four hours. Article published 2022-03-12 A lower control arm can cause popping, steering bicycle shakes and irregular tire article of clothing
What Goes Incorrect?
How Much Does it Cost?
Let's Get Started


Lookout man the Video!


Got Any Questions?
Source: https://www.2carpros.com/articles/lower-control-arm-bushing-replacement
Posted by: brownvalustaides1958.blogspot.com
0 Response to "How To Change Upper Control Arm Bushing On 2002 Buick Rendezvous"
Post a Comment